CloudResearch's MTurk Toolkit was designed to simplify the process of setting up and launching studies on Amazon's Mechanical Turk. To set up your study, follow the steps below.
- Basic Information
- Describe HIT
- Setup & Payment
- Demographic Options
- Data Quality
- Worker Approval
- Worker Requirements
- Review and Launch your Study from the Dashboard
To begin creating your study, click Create a Study in the header and then choose MTurk Toolkit.
1. Basic Information
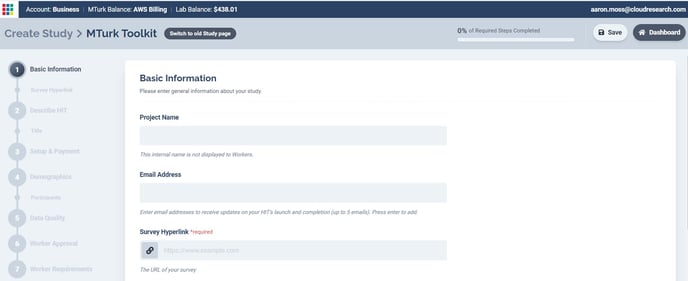
On this page, you can give your project an internal name (i.e., not shown to participants) and provide up to five email addresses to associate with the study. We will send a message to these addresses when your study launches and when it completes.
Next, enter your Survey Hyperlink and decide whether to auto-capture worker information from the URL. Finally, choose whether to provide participants with additional privacy by Anonymizing Worker IDs or telling CloudResearch not to collect IP addresses. These features are under “Additional Privacy Options” on the bottom of the page.

2. Describe HIT
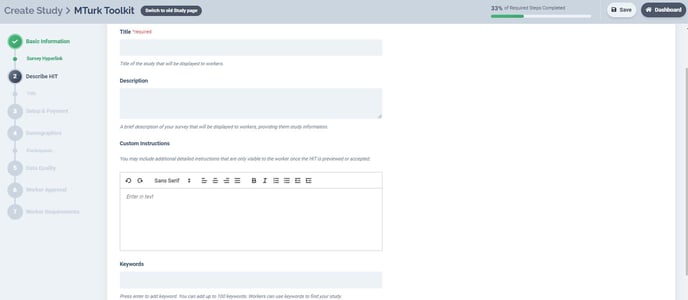
The next step is to describe how you want your study to appear on MTurk. You can give your study a public title that will be visible to participants. You can also provide a description of the HIT and any custom instructions or keywords you'd like associated with the HIT. The description and custom instructions boxes should be used to inform participants of anything they may be asked to do that is beyond the normal scope of MTurk studies (e.g., download an app, participate in a dyadic study).

3. Setup & Payment
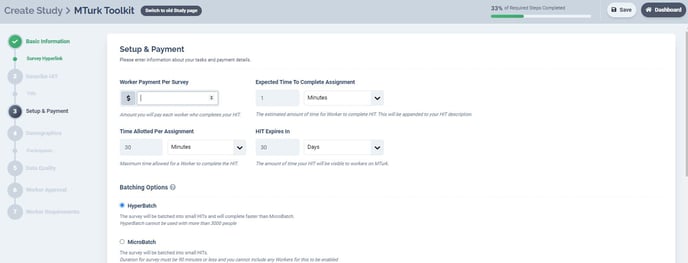
Specify how much each participant should be paid and provide an estimate of how long the study should take. In addition, specify what the maximum amount of time participants should have to complete your study is with the "Time allotted per assignment" box.
The maximum time per assignment influences not only how long participants have to work on your study, but also several important aspects of restarting, pausing, and editing your HIT. We recommend giving people 3 to 4 times as long as you expect the study to take.
Next, choose from our two Batching options--MicroBatch or HyperBatch--both of which save you 50% off MTurk’s fees.

4. Demographic Options
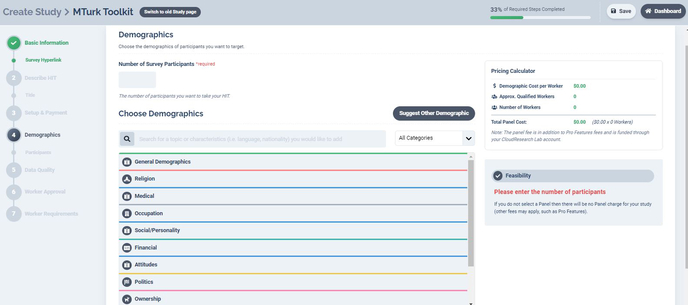
Enter the total number of participants you want to sample. Then, select any demographic features of the sample you intend to target.
Panel options include general demographics such as age, ethnicity, and gender, as well as categories like political affiliation, occupation, and financial status. There are many demographic options to choose from including targeting people based on the U.S. Geographic Regions, their personality type, whether they are pet owners, and much more.
You can search for demographic options of interest using the search bar in this tab.

To understand the cost of your demographic targeting and whether we have enough people profiled to meet your needs, you can use the Feasibility Calculator. Once you begin selecting the demographic characteristics for your sample and enter the number of participants you'd like, the calculator will estimate the cost. Panel costs range from .13 to .67 cents per participant, depending on how difficult it is to reach the sample you select.
Note: Panel costs are in addition to the participant compensation, MTurk fees, and CloudResearch fees associated with your study (learn more).
Whenever we believe recruiting your desired sample may be difficult, you will receive a message that your study may not reach the number of participants you desire. When you receive this message you can: a) proceed anyway, launching your study to see if you can collect enough participants, b) set up and launch your survey on Prime Panels, or c) contact our customer service to see how we can help. We may be able to provide you with a quote for what the study would cost with our managed research service, which would guarantee you reach your desired sample.
5. Choose How Workers are Approved
You must decide how participants who complete your study will be approved. There are two completion code options—fixed or custom—and two approval methods: automatic or manual.
If you use an automatic approval method, you must also decide how long to wait before participants are automatically approved
6. Worker Requirements
There are several options for specifying who is eligible or ineligible for your study. For example, if you want to Exclude participants who took one of your previous studies or Include participants who took a Time 1 study so that they can participate in Time 2, both options are available on this page.
On this page you can also specify worker qualifications such as approval rating and number of HITs completed. Finally, from this page you can choose whether to Block Workers from Suspicious Geolocations and whether to apply a Universal Exclude List.
7. Data Quality Solutions
To manage data quality, you can choose to limit your study to CloudResearch Approved Participants or leave your study open to everyone on MTurk. When you use the Approved List, we block people who have failed CloudResearch's ongoing screening.
Opening your study to All MTurk Participants means everyone on MTurk may potentially take your study, including people who are inattentive, or are outside of the US and using VPN to fraudulently make it appear that they are within the US.
If you choose the CloudResearch Approved Participants option, your study will only be open to people who have been vetted by CloudResearch. Participants on this list have shown prior evidence of attention and engagement and represent various levels of experience on MTurk, different ages, races, incomes, and are generally demographically similar to other MTurk workers.
The Approved List is our recommended option for the highest level of data quality.
8. Save, Review, and then Launch your Study
Finally, save your study. Once the study is saved, it will appear on your Dashboard where you can Review and then Launch it. You should always review your HIT, preview your survey, and when possible pilot your study before launching the full version.
